


Unity game development can seem overwhelming at first. But it’s easier than you think.
Unity is a powerful game engine used by both beginners and pros. It helps create stunning 2D and 3D games. Whether you dream of making a simple mobile game or a complex console adventure, Unity offers the tools you need.
The best part? It’s beginner-friendly. With a bit of guidance and practice, you can get started quickly. This guide will walk you through the basics. By the end, you’ll have a solid foundation to build on. Ready to dive into game development? Let’s get started with Unity!
Introduction To Unity
Getting started with Unity game development can be exciting. Unity is a powerful tool for creating games. It is used by many developers worldwide. In this section, we will explore Unity. We will look at what Unity is, its history, and why you should choose it.
What Is Unity?
Unity is a game engine. It helps developers create 2D and 3D games. It offers a wide range of features. These features make game development easier. Unity is user-friendly and flexible. It supports various platforms. This means you can create games for PC, mobile, and consoles.
History Of Unity
Unity was first released in 2005. It was created by Unity Technologies. The goal was to make game development accessible. Over the years, Unity has evolved. It has become one of the most popular game engines. Many successful games have been made with Unity. It continues to grow and improve.
Why Choose Unity?
Unity is popular for many reasons. It is easy to learn. Beginners can quickly get started. Unity has a large community. This means you can find help and resources easily. There are many tutorials available. Unity also offers a free version. This makes it accessible to everyone. It supports many platforms. You can create games for different devices. Unity’s powerful tools and features make game development fun and efficient.

Credit: edgegap.com
Setting Up Your Environment
Embarking on your journey into Unity game development is exciting, but before you can start creating your first game, you need to set up your environment. This involves installing the necessary software and ensuring your computer meets the required specifications. Don’t worry, I’ll guide you through the process step-by-step. Let’s dive in!
Installing Unity Hub
The first step in setting up your environment is to install Unity Hub. Unity Hub is a management tool that helps you manage your Unity projects, installations, and licenses.
- Go to the official Unity download page.
- Click on the Download Unity Hub button.
- Once downloaded, run the installer and follow the on-screen instructions.
Unity Hub is now installed, and you’re ready to move on to the next step.
Downloading Unity Editor
With Unity Hub installed, you can now download the Unity Editor, which is where you’ll do all your game development work.
- Open Unity Hub.
- Click on the Installs tab.
- Click the Add button.
- Select the version of Unity you want to install. It’s usually a good idea to choose the latest stable release.
- Click Next, then select the components you need (e.g., Android Build Support, iOS Build Support).
- Click Done to start the installation.
Once the installation is complete, you will have access to the Unity Editor through Unity Hub.
System Requirements
Before diving deeper, it’s crucial to check if your computer meets the system requirements for Unity. Below are the minimum and recommended specifications:
| Component | Minimum Requirements | Recommended Requirements |
|---|---|---|
| Operating System | Windows 7 SP1+, macOS 10.12+, Ubuntu 16.04+ | Windows 10, macOS 10.14+, Ubuntu 18.04+ |
| CPU | Intel Core i3 or AMD equivalent | Intel Core i7 or AMD Ryzen |
| GPU | Graphics card with DX10 (shader model 4.0) capabilities | Graphics card with DX11 (shader model 5.0) capabilities |
| RAM | 4 GB | 8 GB or more |
Now that you have installed Unity Hub and the Unity Editor, and confirmed your system meets the requirements, you’re all set to start your game development journey!
Remember, every developer starts from scratch. Take it one step at a time, and soon you’ll be creating amazing games. Happy coding!
Navigating The Interface
Getting started with Unity game development can seem overwhelming at first, especially when you are faced with a complex interface filled with numerous tools and panels. But don’t worry, once you get the hang of the Unity interface, you’ll see how it can make game development a more efficient and enjoyable process. In this section, we’ll take you through the basics of navigating the Unity interface, helping you get comfortable with the essential elements you’ll be working with.
Understanding The Dashboard
The Unity dashboard is the central hub from which you control your project. When you open Unity, the dashboard is the first thing you see. It provides access to your projects, tutorials, and the Asset Store. Here’s a quick breakdown of what you’ll find:
- Projects Tab: This is where you can create new projects or open existing ones. You can also manage project templates here.
- Tutorial Tab: Unity offers a variety of tutorials to help you get started. These are especially useful for beginners.
- Asset Store: Need some assets for your game? The Asset Store is where you can find models, animations, sounds, and more.
Think of the dashboard as your starting point. It’s where your journey into Unity begins every time you launch the application.
Project Structure
Once you dive into a Unity project, understanding its structure is crucial. Here’s a simple breakdown:
| Folder | Description |
|---|---|
| Assets | This is where all your game assets live – scripts, textures, models, audio files, etc. |
| Library | This folder stores imported asset metadata. Unity manages this for you. |
| Project Settings | Here, you’ll find settings for your project, like quality settings, input settings, etc. |
| Temp | Unity uses this folder for temporary files. You usually don’t need to worry about it. |
Keeping your project organized is key to smooth development. Trust me, future you will thank you for a tidy asset folder!
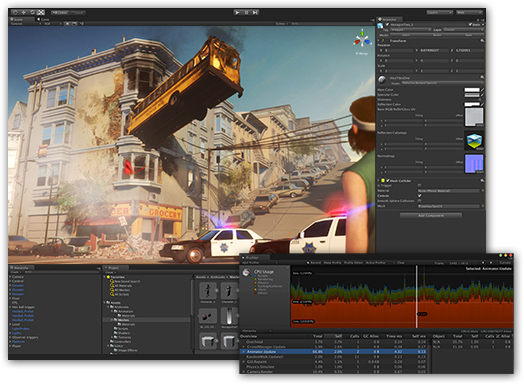
Key Panels And Windows
Unity’s interface is made up of several key panels and windows, each serving a specific purpose:
- Hierarchy: This window displays all the objects in your scene. Think of it as a list of everything that exists in your game world.
- Inspector: When you select an object in the Hierarchy, its properties appear here. You can modify anything from position to custom scripts.
- Scene View: This is your workspace where you can move, scale, and rotate objects. It’s a visual representation of your game world.
- Game View: Want to see what your game looks like? The Game View shows you exactly that. It’s like pressing play on your game.
- Project: Similar to a file explorer, it shows all the assets in your project. You can import, organize, and manage your files here.
- Console: Debugging is a big part of game development. The Console window displays errors, warnings, and other messages from your scripts.
Each of these panels plays a vital role in game development. Knowing how to navigate and use them will make your work much easier and more efficient. It’s a bit like learning to drive – once you know what all the controls do, you’re ready to hit the road!
By familiarizing yourself with these elements, you’ll be well on your way to mastering Unity’s interface and creating your first game. Remember, every expert was once a beginner. Happy developing!
Credit: www.dice.com
Creating Your First Project
Starting with Unity game development can be exciting and overwhelming. Knowing where to begin is crucial. In this section, we’ll guide you through creating your first project. This will help you understand the basics and set a strong foundation for your game development journey.
Starting A New Project
Open Unity Hub and click on the ‘New’ button. Choose the template that fits your game idea. For beginners, the ‘3D’ template is a good starting point. Name your project and choose a location to save it. Click ‘Create’ to start your new project.
Basic Scene Setup
After creating your project, Unity opens with a default scene. This scene includes a camera and a light. Navigate to the ‘Hierarchy’ window to see these objects. The ‘Scene’ window allows you to view and arrange objects in your game world. Use the toolbar to move, rotate, and scale objects.
Adding Game Objects
To add new objects, go to the ‘Hierarchy’ window and right-click. Choose ‘3D Object’ and select the shape you want, like a cube or sphere. These objects will appear in your scene. You can adjust their position, rotation, and scale using the ‘Inspector’ window.
With these steps, you have created a basic scene with game objects. Experiment with different shapes and settings. This will help you get comfortable with Unity’s interface and tools. Happy game developing!
Basic Scripting With C#
Basic scripting with C# is a fundamental skill for Unity game development. Understanding how to write scripts allows you to bring your game to life. In Unity, C# is the primary language for scripting. You’ll use it to control game objects, manage game logic, and create interactive experiences.
Introduction To C# In Unity
C# is a powerful and versatile language. Unity uses C# due to its simplicity and efficiency. To get started, you need to know some basic syntax and concepts. Unity’s editor provides tools to write and manage C# scripts. You’ll use the MonoBehaviour class frequently. It serves as the base class for all scripts in Unity.
Writing Your First Script
Open Unity and create a new project. Go to the ‘Assets’ folder, right-click, and select ‘Create’ > ‘C# Script’. Name your script something meaningful. Double-click the script to open it in your code editor. You’ll see some default code. This includes ‘using’ statements and a class definition. Inside the class, you’ll find methods like ‘Start()’ and ‘Update()’. These methods handle initialization and frame updates.
Write a simple script to move an object. Inside the ‘Update()’ method, add this line: transform.Translate(Vector3.forward Time.deltaTime);. Save your script and return to Unity.
Attaching Scripts To Objects
Now, attach your script to an object. In the Unity editor, select the object you want to move. Drag your script from the ‘Assets’ folder to the ‘Inspector’ window. The script is now attached to the object. Press ‘Play’ to see your object move.
Experiment with different scripts and objects. This will help you understand how scripting affects gameplay. Practice is key to mastering Unity game development.

Credit: blog.neverinstall.com
Working With Assets
Working with assets is a key part of Unity game development. Assets include all the elements that make up your game. These can be models, sounds, textures, and more. Managing assets well can make your game development smoother and more efficient.
Importing Assets
To start, import assets into your Unity project. Unity supports many file types for assets. Drag and drop files into the Project window. You can also use the “Import New Asset” option. Ensure your assets are in compatible formats. Common formats include .fbx for models and .png for images.
Using The Asset Store
The Unity Asset Store is a great resource for developers. It offers a wide range of assets. You can find free and paid assets here. Download assets from the store to save time. This can help you focus on other parts of your game. Search for what you need, then add it to your project.
Organizing Your Assets
Good organization is crucial for managing assets. Create folders for different asset types. For example, have separate folders for models, textures, and sounds. Name your assets clearly. This makes them easy to find later. Use subfolders for more detailed organization. This keeps your project tidy and efficient.
Building And Testing
So, you’ve been working hard on your game in Unity and now comes the exciting part: building and testing. This is where you see all your hard work come to life on different platforms and ensure everything runs smoothly. Let’s dive into the specifics to make sure you’re well-prepared for this crucial phase.
Building For Different Platforms
Unity is incredibly versatile, allowing you to build your game for multiple platforms such as Windows, MacOS, Android, iOS, and even consoles like PlayStation and Xbox. Here’s a quick guide to get you started:
- Windows/MacOS: Go to File > Build Settings. Choose your target platform, and then click Build. Unity will create an executable file you can share with others.
- Android/iOS: Make sure you have the necessary SDKs installed. Select your mobile platform in the Build Settings, and follow the specific steps for each platform. For Android, you’ll need Android Studio, and for iOS, Xcode.
- Consoles: You’ll need specific development kits provided by the console manufacturers. These usually require approval from the platform’s owner, like Sony or Microsoft.
Remember, each platform has its own requirements and nuances. Double-check the documentation for any specific details.
Testing Your Game
Testing is a critical part of game development. It’s your chance to find and fix bugs before your players do. Here are some testing methods:
- Playtesting: The simplest form of testing. Play your game from start to finish. Take notes on any issues you find.
- User Testing: Get friends or colleagues to play your game. Fresh eyes can spot issues you might have missed.
- Automated Testing: Unity allows you to write automated tests. These can help you quickly find issues in your code.
Don’t forget to test on the actual devices you’re targeting. A game that runs well on a high-end PC might struggle on a mid-range Android phone.
Debugging Tips
Even the best developers encounter bugs. Here are some tips to help you debug effectively:
- Use the Console: Unity’s Console window is your best friend. Look for any errors or warnings that appear.
- Log Statements: Use
Debug.Logto print messages to the console. This can help you track the flow of your code. - Breakpoints: Use breakpoints in your code to pause execution and examine variables. This is great for finding out why something isn’t working.
- Community Help: Don’t be afraid to ask for help. Unity has a large community of developers who can offer advice.
Debugging can be frustrating, but it’s also incredibly rewarding. Each bug you fix brings you one step closer to a polished game.
Building and testing your game is an exciting phase of development. With these tips, you’ll be well on your way to creating a game that runs smoothly on all your target platforms. Happy developing!
Next Steps In Unity Development
So, you’ve completed your first Unity game—congratulations! But don’t rest on your laurels just yet. The journey of a game developer is an ongoing process of learning and refining your skills. The next steps in Unity development will help you become more proficient and expand your creative horizons. Here’s what you need to do to keep growing:
Learning Resources
To continue improving, you’ll need to tap into various learning resources. Here are some avenues you can explore:
- Online Tutorials: Websites like Udemy and Coursera offer in-depth Unity courses.
- Books: There are many books written by experienced developers that cover advanced Unity topics. One popular choice is “Unity in Action” by Joe Hocking.
- Official Documentation: Don’t underestimate Unity’s own documentation. It’s a treasure trove of information.
Joining The Community
Game development can sometimes feel isolating, but it doesn’t have to be. Joining the Unity community can provide support, inspiration, and even collaboration opportunities:
- Forums: The Unity Forum is a great place to ask questions and share your progress.
- Social Media: Follow Unity-related hashtags on Twitter or join Facebook groups dedicated to Unity developers.
- Local Meetups: Check out Meetup.com for local Unity groups. Networking can open doors you didn’t even know existed.
Exploring Advanced Features
Once you have the basics down, it’s time to dive into Unity’s more advanced features. Here are a few to get you started:
- Physics: Learn how to implement realistic physics for a more immersive experience.
- Shaders: Creating custom shaders can dramatically change the look of your game.
- Networking: If you’re interested in multiplayer games, understanding Unity’s networking tools is essential.
Remember, the goal is not to master everything at once but to gradually build your skills. Take it one step at a time, and soon you’ll find yourself creating more complex and engaging games.
So, what are you waiting for? Dive back into Unity, armed with new knowledge and connections, and start creating something amazing!
Frequently Asked Questions
Is Unity Good For A Beginner?
Yes, Unity is great for beginners. It offers user-friendly tools, extensive tutorials, and a supportive community. Start creating games easily.
Does Unity Use C++ Or C++?
Unity primarily uses C# for scripting. The engine itself is built with C++. C# is the main language for Unity development.
Can I Learn Unity By Myself?
Yes, you can learn Unity by yourself. Many online tutorials, courses, and resources are available to help you.
Can A 13 Year Old Learn Unity?
Yes, a 13-year-old can learn Unity. Many resources and tutorials are available online to help beginners.
Conclusion
Starting with Unity game development is easier than you think. Follow the steps outlined in this guide. Practice consistently to improve your skills. Join online communities for support and inspiration. Explore Unity’s extensive documentation and tutorials. Experiment with different projects to learn more.
Stay patient and enjoy the process. Soon, you’ll create amazing games. Keep learning and growing. Happy game developing!